How well do you know the chain stitch? Did you know there are many variations of almost all embroidery stitches? The chain stitch is no exception.
In my previous post, 5 Chain Stitch Variations For Your Next Embroidery Project, we explored five of the easier chain stitch variations that work well for straight lines. Now we're going to dive into more chain stitches that are a little more playful and decorative. Have fun!
Here's 5 playful chain stitches you'll want to use for decorative embroidery.

Russian Chain
The Russian chain stitch is three interconnected chain stitches. They look similar to a flower and can be used as a motif or created in rows.
Here's how to create the Russian chain stitch:
Start by making the center chain stitch.
Do not bring the needle back down through the fabric to make the top stitch of the chain. Instead, stick the needle into the top loop of the chain.
With the needle still in the fabric, pop it back up through the fabric at the top of the left diagonal chain stitch.
Then wrap the thread around the needle, creating the chain link.
Gently tug the thread so that the loop is flush with the fabric.
Make a short stitch at the top of the loop to hold it in place.
Next, add the diagonal chain stitch on the right. Bring the needle in to the fabric at the inside of the center chain stitch.
Pop the needle back up through the fabric at the top point of the right diagonal chain stitch.
Then wrap the thread around the needle.
Gently tug the thread to create the chain link and make a short stitch at the top of the loop to hold it in place. This creates one Russian chain.

Zig Zag Chain
This variation of the chain stitch is single chains connected in a zig zag pattern.
Here's how to create the zig zag chain stitch:
Start by making on chain stitch at an angle.
With the thread sticking out of the top loop of the first chain stitch, create the next chain link in a perpendicular direction.
Repeat adding zig zag chain stitches until the line is complete.
To finish the zig zag chain stitch, make a short stitch at the top outer edge of the last chain stitch. This will hold the chain link in place.

Wave Chain
The wave chain stitch is three connected chain stitches that ascend in order, similar to a wave. Along with the different lengths of chain stitches, the wave chain stitch is also made at different angles, accentuating the wave effect.
Here's how to create the wave chain stitch:
Start by making one chain stitch at an angle.
Instead of bringing the needle back down through the fabric to hold the chain link in place at the top, bring the needle back into the fabric next to the base of the chain stitch.
Lay the thread the is coming out of the top of the chain stitch onto the fabric and pop the needle back up through the fabric slightly higher than the previous chain stitch. This adds the second wave.
Now add the third by bringing the needle back down through the fabric next to the start of the previous stitch.
Lay the thread coming out of the second chain stitch flat on the fabric.
Then pop the needle back up through the fabric slightly higher than the previous chain stitch. This creates a complete wave chain.
Add the next wave chain by angling the first stitch of the next wave chain in a perpendicular angle and repeat.
To finish the wave chain, make a short stitch on the outer edge of the tallest chain link.

Interlaced Chain
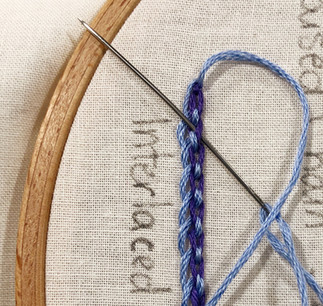
The interlaced chain stitch reminds me of pekinese stitch. This stitch builds on the chain stitch and interlaces thread to create a looped effect around the chain.
Here's how to create the interlaced chain stitch:
Start by making one line of chain stitches.
With a new thread, bring the needle up through the fabric at one end of the chain stitch line.
From the outer edge of the chain link, slide the needle underneath the outer side of the second chain link.
Tug the thread so that it’s flush, but not tight to the fabric. You want to see the thread loop.
From the opposite direction, slide the needle underneath the outer edge of the first chain link and the second thread. This creates the first interlaced stitch.
Continue adding interlaced stitches along one side of the chain link.
When one side is complete, bring the needle to the back of the fabric and knot the thread.
Then stitch the other side of the interlaced chain stitch by bringing the needle back up through the fabric where the interlacing started and repeat on the other side.

Raised Chain
The raised chain or raised chain band stitch looks different than many of the other chain stitch variations. This stitch builds off of straight stitches and sits higher off of the fabric. This variation can also have multiple rows of raised chains on the straight stitches underneath.
Here's how to create the raised chain stitch:
Start by making straight stitches that are evenly spaced and the same height along the length of the raised chain.
Next add the raised chain. This can be made in the same or a different thread color. Bring the threaded needle up parallel with center of the outer edge of the first straight stitch.
Next, slide the needle underneath the first straight stitch, towards where the thread is coming out of the fabric.
Gently tug the thread so that it’s flush with the fabric.
Lay the thread across the straight stitch, then slide the needle underneath the first straight stitch and over the laid thread.
Gently tug the thread to create a loop around the straight stitch. This is the first link in the raised chain.
Continue to add raised chain stitches along the straight stitches by sliding the needle underneath the second straight stitch and towards the first straight stitch.
Lay the thread across the straight stitch, the slide the needle underneath the straight stitch and over the laid thread.
Gently tug the thread loop.
At the end of the raised chain stitch, made a short stitch on the outer edge of the last loop to hold the raised chain in place.


Comments